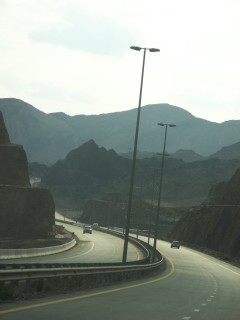

How exactly do you turn the dull, boring image on the left into the one on the right? Easy, read on for the tutorial!
01. The Basics of GEGL
For this tutorial, you will need the GIMP. It’s a program much like Photoshop, only it’s open source and free. If you don’t have it, you can download the latest version here.
(Sorry, Adobe users, I haven’t used commercial software for more than 5 years now, so my Photoshop knowledge is woefully out-of-date. There may be a method and plugin in PSD that does similar things, but I have no idea if that’s true or what it is. If you do, then please leave a comment about it at the end of the page. Thanks.)
Once you’ve installed and started the GIMP, open your photo (please work from a copy so as not to mistakenly overwrite your original file!) and navigate to the Tools dropdown menu and select GEGL Operation… as shown below left.


Now the GEGL Operation window will show up. Click on the currently-empty Operation box and select C2G. If you don’t want it to start working on the image as soon as you click it, uncheck the Preview box. If you leave it on, then it will take a while depending on your computer and the size and complexity of the image to apply the effect on the picture.

Above you see the default values of the C2G plugin. For now we’ll leave them as is. Depending on the picture, you may not need to tweak these at all, but for this tutorial I have chosen one that does need a bit more work. If the default values work for you, go ahead and click OK.

This is what the picture looks like with the default values. First of all, the sky looks hideous. The C2G plugin has a knack of picking out detail you may not even know existed in your pictures. I’ve found it to work especially well on overexposed or low-contrast images. But in this case, it’s done a bit too much. I also don’t like the lack of subtle greys and blacks in the picture; it looks a little too much like a computer effect.
But first thing’s first: fixing that sky.
02. Flattening the Sky

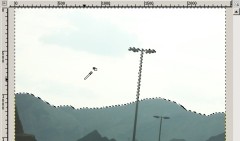
We’re going to have to make that sky a lot simpler so its hidden details don’t get picked up by C2G. Select the sky with the Magic Wand (Fuzzy Select) tool. Add to the selection by keeping shift pressed when you click until the majority of the sky is selected. It’s okay if a few bits near the mountains aren’t because we don’t want to chop any of them off.
 Now, using the Eye Dropper tool pick a light colour in the sky that you want to fill it with. It doesn’t matter if it’s almost white, as we will see later. Right now you just want an even tone. In the Layers pane, create a New Layer (and make sure you select ‘Transparent’) above the current layer (i.e. your original image). This is where we’ll paint in the flat sky’. The marching ants will still be visible around your selection of the sky, and using the Paint Bucket tool, fill in this selection on the transparent layer with the light colour we selected before (as seen below).
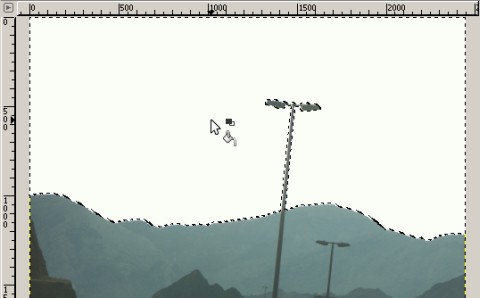
Now that the sky is mostly flat and white, go to the Layer dropdown menu and select Merge Down. The flat light sky has now been pasted onto the old one, and we can get back to converting it to Black & White.

03. Tweaking GEGL


Reopen the GEGL operations window and select C2G as before. Now that it has been flattened the sky renders as a smooth grey. But the default values still aren’t producing the desired results (left) so I tweak the variables in the C2G window until I am satified, and get the image on the right.

Here are my tweaked values for this picture. I have increased the radius to 400 — I find that this gives me better grey tones in the foreground elements, and less harsh black/white sections. I also increase samples to 5, as this puts in more black into the image. And finally, the iterations go up to 15 resulting in a smoother, less-noisy image.
It’s hard to come up with an all-purpose setting for this, but I’ve found that for most of my photos, somewhere around these values produce the results I want. Fool around with them and see what suits you. Remember, however, that as the samples and iterations go up, processing time will too. It’s already a pretty slow process, and without a progress bar it’s a bit unnerving to sit there waiting. My advice is to put preview on, let it do its thing, and apply when it’s done. Go do something else in the meanwhile. Fix yourself some coffee, or check your email. The results are worth the wait!
We aren’t done, however, as that sky is now just a little too flat for my liking. Let’s see what we can do with it.
04. Un-Flattening the Sky
You’re probably wondering why I’m tweaking the sky after converting it to Black and white using C2G. The answer is because I’ve tried doing it after the next step, and you don’t want to see how ugly the results were, he he. So save any gradient tinkering — as we will do below — for after the conversion, or C2G will bring out revolting shapes in it just like it did the clouds in the original, untweaked image.

Using the Magic Wand tool again, select the now-grey sky. The C2G process has probably added in a good deal of noise here, so it won’t select as much as it did before, and you can probably spend a half-hour shift-clicking like crazy to get all of it selected.
 Instead, adjust the threshold on the magic wand tool’s options (at the bottom of the left-hand pane). I found that 50 worked for me here (the default was 15). Don’t put too high a number here or half you image will be selected, not just the sky! As always, pushing the numbers up a little at a time will get you to the sweet spot easier. Now, go ahead and select the clouds as above. You don’t need to get all of it like before — a few gaps here and there are okay.
Use the eyedropper to select the grey colour the sky has now become before the next step.
 Now we need to remake the sky, so to speak. Select the Gradient Tool. In the right pane, make sure FG to BG is selected. The Foreground Color (FG) is the grey we selected, and by the default the Background Colour (BG) is white. This will do nicely, as the C2G process usually adds a white glow around sharply defined shapes like the tops of the mountains here.

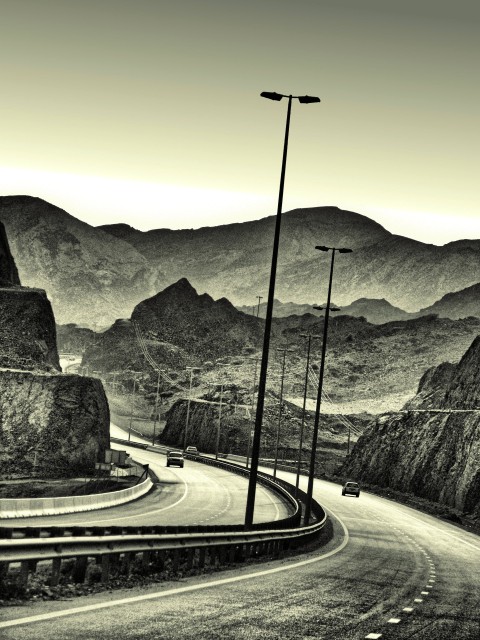
Now create a gradient for the sky keeping in mind the horizon. In this picture I have the handy telephone poles acting as a natural perpendicular to the horizon. Since its a skewed image, just make sure the gradient is drawn more or less parallel to this line as shown in the picture, ending a little bit above the edge of the selection where the white glow and the grey intermingle.
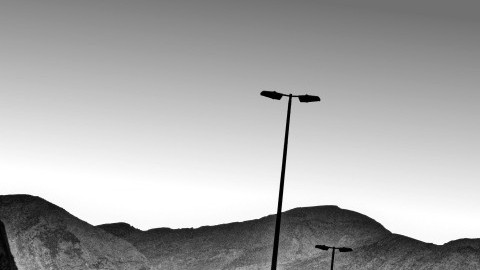 And here we have the finished gradient. If you are satisified that it all looks okay, clear any selections, because there’s one final step.
05. Adding a Bit of Colour
The odd thing about Black & White images is that they aren’t all truly black and white. In the film days the chemicals and elements used in each film stock produced subtle variations — subtle colours — in the final image. Sepia images have a brownish tinge, and cyanotype ones blue. How to recreate these in the computer, while keeping the black and white image as we’ve just done?
Thankfully the folks over at GIMPguru.org have come to our rescue! You can follow their detailed tutorial on sampling toned images here (but I’ve covered the basic method below). The real resource you’ll need, though, is their massive collection of Toning Samples. Download the ones you need, the ones you’d like your photos to look like. I find that I like Platinum Palladium the most, so I’ve used it in all of these examples, and in this tutorial below.
Once you’ve downloaded a sample, while keeping your C2G tweaked image open too, open the toning sample. Select your black and white image’s window. Now you need to map the tones to this image, so go to Colors –> Map –> Sample Colorize…
The Sample Colorize window will come up, hopefully showing your image on the left (Destination) and the tone map on the right (Sample). If not, select each until as shown above from the drop down menus.
Then, click on Get Sample Colors to transfer the tones from the sample to your image. You can fiddle around with the setting to your liking, but I usually find that the defaults work okay. Finally, click Apply.
And that, in a nutsell is it! The image has been converted to Black & White, and given a spiffy tone. Here’s the result:
06. And Finally…
I hope you enjoyed this tutorial on my personal method of black & white conversion. All of this information can be found through a quick google search in other places, but I always find that there are always tiny variations and quirks to how each photographer interprets and employs a technique, and so another one doesn’t hurt.
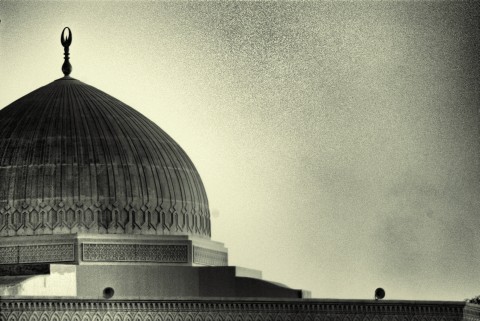
I leave you with some more Before/After examples of pictures made with this method. Enjoy.




V


 Now, using the Eye Dropper tool pick a light colour in the sky that you want to fill it with. It doesn’t matter if it’s almost white, as we will see later. Right now you just want an even tone. In the Layers pane, create a New Layer (and make sure you select ‘Transparent’) above the current layer (i.e. your original image). This is where we’ll paint in the flat sky’. The marching ants will still be visible around your selection of the sky, and using the Paint Bucket tool, fill in this selection on the transparent layer with the light colour we selected before (as seen below).


 Instead, adjust the threshold on the magic wand tool’s options (at the bottom of the left-hand pane). I found that 50 worked for me here (the default was 15). Don’t put too high a number here or half you image will be selected, not just the sky! As always, pushing the numbers up a little at a time will get you to the sweet spot easier. Now, go ahead and select the clouds as above. You don’t need to get all of it like before — a few gaps here and there are okay.
  Now we need to remake the sky, so to speak. Select the Gradient Tool. In the right pane, make sure FG to BG is selected. The Foreground Color (FG) is the grey we selected, and by the default the Background Colour (BG) is white. This will do nicely, as the C2G process usually adds a white glow around sharply defined shapes like the tops of the mountains here.
 And here we have the finished gradient. If you are satisified that it all looks okay, clear any selections, because there’s one final step.


